How To Make ID Cards At Home or In-House
|
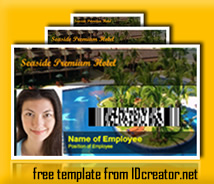
Using a free online designer
If you don't have a design for your ID cards, there's no need to worry! IDCreator.com is a free, online ID card design tool with thousands of design templates that you can quickly modify to fit your needs. You can even insert scannable barcodes or magnetic stripes onto your cards to increase security!
Using Photoshop
If you have image editing expertise, you can create the designs from scratch using any image editing program you have, such as Adobe Photoshop. If you're using a Windows computer, there is a program called GIMP which is a free program similar to Photoshop. If you're making your design in an image editing program, be sure your cards are 3.375" x 2.125". The cards also have 0.25mm rounded corners, but its best just to leave the corners on your design template: that leaves you with some wiggle room (or more technically, "bleed" room).
|
|
|
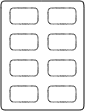
Synthetic paper
Print the cards onto a synthetic printing paper, such as Artisyn® or Teslin®. These synthetic papers trap the ink in place, so that when it is laminated it can bind with a butterfly pouch and make an ID card that is identical to the look and feel of a standard PVC card (just like the cards in your wallet). These sheets are available either as a full sheet, or microperforated with 8 ID card-sized punchouts on each sheet.
Microperforated sheets
Using microperforated sheets simplifies the ID making process by eliminating the need for you to cut the cards out by hand, which can be tedious and difficult to perfect. After printing, simply 'punch' each card out of the sheet. You then have perfectly sized and trimmed ID card inserts.
Printer
Any printer can be used with Artisyn® because of its high-quality and versatility. However, when using Teslin® you have to make sure you use the correct sheet for your printer. Teslin® Waterproof InkJet is for inkjet printers and Teslin® Thermally Stable is for laser printers. (Using an InkJet Printer achieves higher quality results with pigmented inks.)
Printing guide
If using an IDcreator.com design, they will provide you with a PDF with 8 ID cards that will print perfectly aligned to the microperforated sheets. However, if you are using your own design software, you can simply place your design images into our Microsoft Word placement guide.
|
|
|
Butterfly laminating pouches
Laminate the printed ID punchout inside of a butterfly laminating pouch. A butterfly pouch is a single piece of premium-plastic that has been scored long-ways down the middle so it can fold together or lay open and flat. Traditionally laminated cards required a border of laminating film in order to secure the paper to the laminate. However, using these special butterfly pouches creates a borderless ID card that is firm, waterproof, and durable.
Standard Glossy or Premium Matte?
There are two types of butterfly pouches available in the ID Card Kits. Standard Glossy pouches are what you would think of as a normal laminate. They are somewhat glossy and reflect light. We also have special-treated Premium Matte pouches which, after lamination, make the card look flat and do not reflect light. If you are trying to mimic the look of PVC cards, Premium Matte pouches are recommended.
7 mil or 10 mil?
A mil is equal to 0.001", so 7 mil is 0.007" thick and 10 mil is .01" thick. A standard ID card is roughly 30 mil thick. For thinner cards, you should use 7 mil butterfly pouches. A 7 mil butterfly pouch adds 14 mils to the card, because the pouch is folded over around your synthetic paper insert, resulting in a 24 mil card. Therefore, this card would be slightly more thin and flexible than a standard 30 mil PVC card. Keep in mind that there are clear adhesive overlays and hologram overlays that can also add thickness to your card.
|
|
|
Security Holograms
Secure your ID cards by adding holographic overlays. Holographic overlays are transparent stickers that can be manually applied on top of your laminated ID cards. They peel off a paper backing and stick on to the card in seconds. They are just slightly smaller than the size of an ID card, allowing you to have a bit of a margin of error when applying.
Ultra-Violet Black Light Ink
For even higher security, UV black light ink should be used. It can be applied through the use of transparant overlays with UV ink embedded in them. Additionally, many of the hologram overlays also include black light ink embedded in them. They can only be seen under a black light. For heightened security environments, UV black light ink is strongly recommended.
|
|
|
Magnetic Stripe Encoding
Encode the cards to work with your existing hardware, such as time-clocks and building-access machines. Butterfly laminating pouches are available with magnetic stripes already embedded into them. Once lamanted, these pouches create cards that are instantly encodable with magnetic stripe encoding machines such as the EasyIDea™ Magnetic Stripe Encoder.
Barcodes
Print barcodes easily using the built in barcode creator at the completely-free IDcreator.com website. You can instantly create standard code39 barcodes, two-dimensional PDF417 barcodes, UPC A & UPC-E barcodes, and Data Matrix barcodes.
|
|
All of the products you need are bundled together and sold in Complete ID Kits.